Posts Tagged ‘modelling’
February 29, 2012
 Here’s the Boy Slug’s latest and possibly greatest an Artizan Parachute Regiment Jeep trundling through wet ground. It’s still awaiting a little bit of matt varnish, but because it has both a water effect on the Fenris base, wet tyres and little specks of mud all over the place we can’t just spray it – hence the shiny berets. The Fenris base was exactly what we needed and found by asking Ian for what we wanted and we got a thumbs up. Saves browsing his encyclopedic and rather excellent range.
 The only bit he’s not too happy with are the numbers which he hand painted because we couldn’t track down any suitable decals in time. He contented himself with painting the beret badges and shoulder patches which worked really well. The water effect was some gloop which we might review later, as a warning rather than a rave it was costly and not too bright to use.
 Hopefully this will feature in a game suggested by Daring Dan who has taken delivery of a scratchbuilt Hartenstein Hotel and so the Oosterbeek Perimeter beckons – let’s hope the fog doesn’t delay it.
Tags:28mm, Airborne, Artizan, Fenris Games, figures, game, gaming, Jeep, metal, model, modelling, painting, Parachute Regiment, Recce, vehicles, wargaming, ww2, wwii
Posted in War Production Report | 1 Comment »
February 27, 2012
 This humble Middle Eastern abode is very much a work-in-progress, hopefully another Slug Industries product soon, borne from my desire to have a few more compounds from reading about the Royal Anglicans time in Afghanistan in book “Attack State Red”. The reports of inter-compound fighting reminded me of fighting in Stalingrad, which explains why Sangin has earned the nickname “Sangingrad” amongst our brave forces.
 For a good skirmish game you do need to get inside the buildings, hence the lift off lid. I’m happy with the scale as the rather fine Eureka figures shows it’s a good fit. There’s three of these on the bench, which will take me up to seven compounds in total, which is just enough for the game I have in mind. The others can be seen here.
 Here’s one in place for it’s fitting of walls. These are foamboard, which is very easy to work and they’ll get a coating of filler to get an irregular finish. The other two will be cork, as I’m after a certain effect on those which you might be lucky enough to read about later. Bet you can’t wait, eh?
You can see how these developed here.
Tags:28mm, Afghan, Afghani, compound, euraka, foamboard, Middle eastern, model, modelling, modern, Scenics & Props, scratchbuild, wargaming
Posted in Buildings on Parade | Leave a Comment »
February 27, 2012
 Here’s a couple of scenics which might put a few of you dear readers to shame. They’re old GW bits which I’ve had hanging around for years which have finally had something done to them, namely the newly honed terrain skills of Captain Stinky aged 7 and 11/12ths. Armed with the finest brushes the 99p shop could offer, a £1 sampler pot from Wilkinsons and a limited choice of bits from his Grandad’s supplies the young lad took his time but did manage a decent pair of models which most of us would be happy to have on our table.
  The pieces have been undercoated, then painted a very light grey and finished with Devian Mud for the wash. Then they’ve been glued to MDF which has a selection of boulders hand-picked by Stinks himself from the beach, sand on the inside and grass on the outside. His very first scenics to accompany his humble collection of W40k figures.
 What des the lad himself think? “Pew-pew-pew” is all I could get out of him.
Tags:28mm, 40K, Captain Stinky, GW, model, modelling, painting, Scenery, Scenics & Props, wargaming
Posted in Scenics & Props | 1 Comment »
February 16, 2012
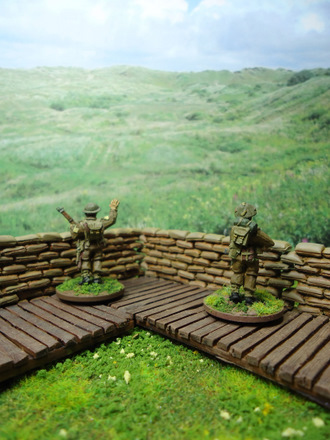
 Gutted as I was to realise I’d already used the pun “Last Ditch Effort” I’m happy with this new secnic which I’ve just completed. It’s not only a handy piece but it proved to me how our humble Slug Industries sandbags and planking actually knock together to make a decent model without the hours I’d have spent in the past by hand making every single piece.
 It also gave me an opportunity to use modrock, a bag of which I’d bought around a decade ago but never even opened. It’s a great material, gloriously messy with a hint of mudpies making the endeavour an even deeper recession into child-like joy. To start with I glued the sandbags in place, then used scrap foamboard to make formers for the ground. I wanted the look of earth which had been dug up and piled just a couple of months before, so quite smooth, howvere if you wanted more craggy a style that would be possible too. I overcoated it with Woodland Scenics plaster, or wotsit hydrocalifornia as they insist on calling it. It was great fun and I recommend it for that reason alone, anything more is a plus eh?
 Then it was a bash of colour prior to flocking. I used three types, short dark for the undercoat, longer on top with a few added sprinkles of a flowery flock. The planking was stuck in place, plus a few crates, an oil drum and some single sandbages which we’ve not released yet and the piece was complete. It comes alive with a few figures, these all Uncle Crouchie’s BEF range now available from the ever regal Warlord Games.
 Finally the hour spents cutting the seams on all those sandbags and the grain on the planking has proved itself worthwhile now on with the slaughter!
Tags:1938, 28mm, Anglican League, building, bunker, how-to, model, modelling, Planking, Sandbags, Scenics & Props, scratchbuild, Trench, Uncle Crouchie, ww1, ww2, wwI, wwii
Posted in Scenics & Props | Leave a Comment »
January 28, 2012
 After the wildly positive private feedback on the ruins I made recently I decided to make a full set. Rather obviously this involved three times as much work to make it up to a set of four. Not so much a chore as a joy.
 All joy has to be tempered by the gods so having boxed up the masters I opened up the twenty kilo drum of rubber to find I didn’t have enough to complete all three moulds. I scraped the bottom of the barrel to get as much done as possible and phoned through an order for new supplies and waited eagerly for delivery.

Lo and behold the completed set, which is available here, which I’m chuffed with and actually excited about getting some paint on. Hurrah!
Tags:28mm, building, Fallout, model, modelling, resin, ruin, ruins, Scenics & Props, wargaming, ww2, wwii
Posted in Scenics & Props | 2 Comments »
January 13, 2012
 There’s not many console games which I ever play for very long, typically five minutes in I decide it’s not for me. Most often it’s the content, sometimes the double declutching controls and rarely, but increasingly so, it’s just too damn fast for my bones. Fallout 3 is one of a trinity of games which I adore, the subject entertains while it’s style is outstanding and the level of detail is stunning. So to make a piece for table top gaming inspired by a game is a first for me with the ruin piece above. It was a fun build, especially in trying to replicate the 1001 grains every pile of rubble in Fallout has.
 To get a castable model was slightly more long winded, as all the holes in the 1001 grains had to be filled. This actually took longer than the original build. I added to the delay by not adding quite enough hardener to the rubber so instead of an 8-12 hour set it took some four days. However I think from the casting above it was worth it.
 The detail starts to stick out with a coat of paint. Excuse the glossly look but it’s still wet. I’m thinking of doing three pieces to add to this – to make a complete ruin. Then we’re offer it up for sale. Although it’s originally influenced by the Post-Apocalyptic it’s suitable for a wide range of periods.
Tags:28mm, Apocalyptic, Fallout, Fallout3, game, gaming, model, modelling, Post Apoc, resin, ruin, scenic
Posted in Scenics & Props, Uncategorized | 3 Comments »
December 31, 2011
 Regular browsers of this humble blog made have noticed just how quiet it’s been recently and for that I can only apologise as I have been busy as a hive of bees making masters to cast from. I really don’t want to corrupt the purity of this blog by trying to sell you things at every turn, but I will share what I’m working on purely from a willingness to illuminate fellow gamers and other chums. Pompous sermon over – so on with the serious business of gaming waffle.
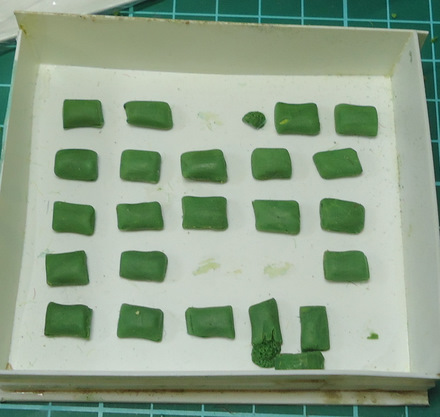
Above is what was meant to be a simple aid for my modelling which set me on the slippery slope of all things trench. Twenty-five seamed sandbags which I made from Greenstuff seemed enough to be able to make sandbag bits for the rest of my life… how wrong I was.
 Making a wall from 64 individual pieces can limit the fun factor so I made a master, which then had to be properly filled, to cast from.
 But then I also needed ends to cap the tessellated walls.
 Now having created the opportunity of endless sandbag walls I realised how I didn’t fancy making miles of planking for walkways. So two sections of 40mm wide and one of 35mm, the larger for main trenches, the smaller for access trenches. Both bigger than the actuality, but this is for gaming.
 That did involve looks of shaping and scribing totalling over a hundred feet. The calculation being made while facing the tedium of actually doing it.
 They paint up rather well, these are just propped up rather than a finished piece hence the gaps, but it gives an idea of the finished product. These are available from us via the blatantly commercial place.
Tags:28mm, gaming, how-to, interwar, model, modelling, Sandbag, Sandbags, Scenics & Props, Trench, Walls, wargaming, ww1, ww2
Posted in Scenics & Props | 3 Comments »
December 31, 2011
For the modern Luddite lacking an airbrush spraying from a can is a regular reality but breathing in the fumes of both propellant and paint is not the best exercise an ageing gamer can take. So here’s a handy mini-project which will solve your solvent worries by creating the biggest spray booth in the world but with minimum storage requirements.
 First find a stick and a flat piece of plasticard, fix the plasticard onto the stick in the style of a fly swat before the invention of the hole. Above I’m about to spray the wheels for a Slug Industries Fred.
 Then attach whatever you wish to spray to the pre-hole flyswat. I used blu-tac but other sticky gummy products are available.
 Then approach a window and open it.
 Then hold the stick end of your new device and stick your arm out of the window. Take care not to fall out of the window.
 Then spray away to your heart’s content, while the wind carries away any fumes or excess paint. Why not build one yourself?
Tags:model, modelling, paint, painting, project, spray, spraybooth, tip, wargaming, worlds biggest
Posted in Projects | 1 Comment »
October 19, 2011
 There’s no certainty as to whether this vehicle for VBCW is a monster truck too far or not, as us loyal bunch of VBCW gamers do seem to have a unique strange arms race of our very British own. It’s one of the Slug Industries “Fred” vehicles, with some tracks from Ramshackle Games, plus the front off a steam roller which was just too damned small for 28mm. It’s early days with this yet, and I’m not sure it’ll be completed in time for the Very British Big Demo Game at Legion at the end of the month. What do you think?
Tags:1938, 28mm, Anglican League, British Union of Fascists, BUF, diecast, interwar, model, modelling, ramshackle games, Slug Industries Fred, VBCW, Vehicle, Very British Civil War
Posted in War Production Report | Leave a Comment »
 Here’s the Boy Slug’s latest and possibly greatest an Artizan Parachute Regiment Jeep trundling through wet ground. It’s still awaiting a little bit of matt varnish, but because it has both a water effect on the Fenris base, wet tyres and little specks of mud all over the place we can’t just spray it – hence the shiny berets. The Fenris base was exactly what we needed and found by asking Ian for what we wanted and we got a thumbs up. Saves browsing his encyclopedic and rather excellent range.
 The only bit he’s not too happy with are the numbers which he hand painted because we couldn’t track down any suitable decals in time. He contented himself with painting the beret badges and shoulder patches which worked really well. The water effect was some gloop which we might review later, as a warning rather than a rave it was costly and not too bright to use.
 Hopefully this will feature in a game suggested by Daring Dan who has taken delivery of a scratchbuilt Hartenstein Hotel and so the Oosterbeek Perimeter beckons – let’s hope the fog doesn’t delay it.


 And although simple, perfect for a quick hack with some paint and flock.
 Not much had to be done , I liked most of the paintwork and it fits with the colours I use on our table.
 Yhe thatch came up well.
 and after some flock looked finished.

