Posts Tagged ‘resin’
December 18, 2012
 This beast of a machine was bought over a year ago as a secret weapon for VBCW, so wishing to keep it a well guarded secret I undercoated it and tucked it behind something on a shelf so no one would know about it until it appeared on the gaming table. During a inreasingly rare fit of tidying I recently found it and set about doing it justice, half from shamefully having forgotten about it and three-quarters from it being an impressive model.
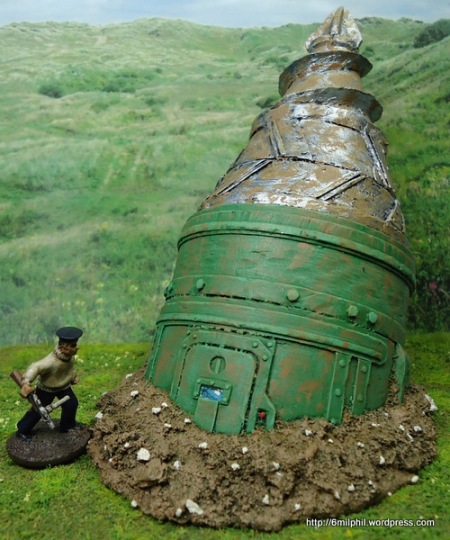
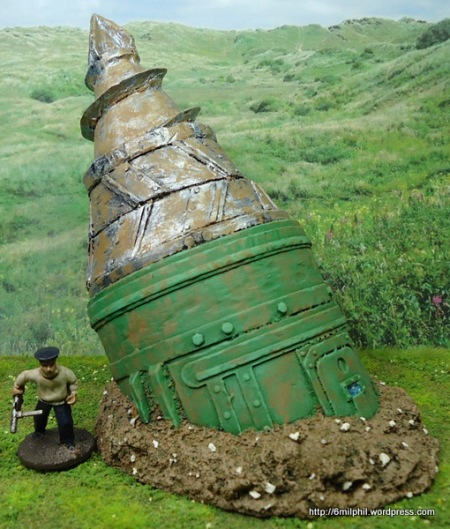 This is a Ramshackle Games piece, who on their website rather unenthusiastically call this a Boring Machine. It has a distinctive VSF feel to it, rather than looking practical it suggests it would drill into the earth up to the hull and then briefly halt before the sharp ends locks solid and the body spins furiously around shaking the passengers to death. This makes it perfect for Very British Civil War.
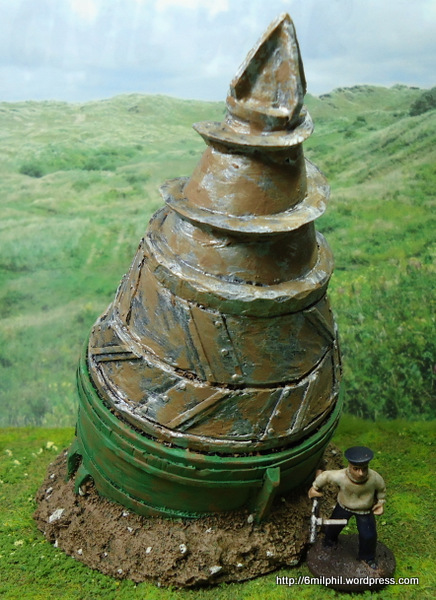
I’m reasonably happy with the paintjob, although I do think it now needs a red band around it with a large “DANGER” decal. The secret is out now of course, so the idea of the ground trembling during a game is likely to bring forth realistic expectations, but at least it means it’s about to hit the table and no longer sit on a shelf.
Tags:1938, 28mm, Boring Machine, Drilling Machine, model, ramshackle games, resin, Tunneling Machine, VBCW, vehicles, VSF, wargaming
Posted in War Production Report | 1 Comment »
November 6, 2012

It’s been a busy few weeks at 6mil Mansions working on three new models starting with the RV/Motorhome above made by the talented Crouchie. It’s an iconic vehicle most recently associated with the “Walking Dead” series, although my commissioning it was driven by only recently seeing “Breaking Bad” which I enjoyed immensely. If you’d like one, and we’d really like you to buy one, there’s more details here. Folk in the U.S. can get one from Brent at Company B. Brent has a great forum presence over at LAF being always willing to share how to do things and he’s greater to work with. Even before he had received the first shipment he’d produced some decals for this model, including both US and UK number plates. What a star!

Secondly here’s a set of city ruins, inspired by Akula’s need for some govermental looking ruins for his “Planet of the Apes” project which we’ll see at Salute 2013. I hope they’re good enough as his project is quite stunning in it’s scope including as it does the Washington Monument, the Lincoln Memorial and a Subway station complete with rusted wrecks of trains. His only problem is finding enough figures as he’s using out of production Eureka apes via forums and ebay. Should you know anyone with any for sale please get in touch. These ruins can be seen over at the Slug Industries site.

Finally the pentultimate Hesco piece in the shape of this command bunker. It’s a massive piece and the mould only just fits in my vacuum chamber. It’s hollow cast to keep the costs down, which is a wise move as there’s been an out-of-the-blue price hike in resin. The roof lifts off this little beauty, and has an interior ripe for detailing. Not that I’ve had time to do that yet.
Tags:28mm, Breaking Bad, building, cast, City Ruins, company b, Crouchie, hesco command bunker, model, Motorhome, resin, ruined, RV, Slug Industries, Walking Dead
Posted in Wonderful Waffle | 4 Comments »
October 16, 2012
 Back in May there was a fine two-part documentary on the BBC featuring Rory Stewart called ” Afghanistan: The Great Game.” which not only brought forth an educated perspective on the country but also offered some stunning imagery. One instance was a couple of Soviet vehicles in the spot they were destroyed during the 80’s rusted into a memorial of bad times past. I thought a similar model would suit my gaming table.

Of course my first concern was the idea of paying for a model and effectively turning it to a non-playable piece of junk. Then I remembered how Bob over at Imprint Models not only did stunning models, but he also has a number of miscasts available at a lower price. I wanted an APC rather than a tank so emailed the man himself and yes, he had some BMP-3’s available. Ура! The condition of the model was impressive for a miscast and wouldn’t take too much work to make a fine model for playing with. With a solid lump of resin as it is there’s no opportunity to make great holes or hollows in it, so the first thing to do was to hack off most of the track from one side. Some of this I reattached to have some hanging track on the front., some went onto the base and some I simply lost.
 Having this sitting flat wasn’t going to work so I make a base with a slope so one side would sit higher than the other, and also have some of the remaining track buried under pebbles. The vehicle and the base had to be done seperately, then joined and some additional work done to finish it.
 I did add some small damage, namely several bullet holes on one side, and a larger RPG one on the other side. Some folk might think it looks too small but I remember watching a Mujahadeen video many years ago of an attack on Russian armoured vehicles and a succesful RPG hit which appeared to my naive eyes to be lttle more than a loud DONK! The small hole it produced did bring the vehicle to a halt and as the cameraman approached still filming it became obvius how the entire crew had died instantly…
 For the rust effect I wasn’t sure what to use so I asked over at Frothers and Freakinacage recommended Modelmates Rust Effect, and once he explained it was a single application effect whereas a lot of rust effect kits are lots of stages with a pot for each. It’s not cheap but it does a stunning job. My key point would be to use it as thinly as possible, but there’s a tutorial via the link above. I really recommend it, great effect with the added joy of being a bit like finger-painting which is always fun given how tightly figures have to be painted.

For additonal rust an old favourite was used, artists pastels. These are messy but are worth it, if you decide to use them consider going for really light tones. Once varnished they go darker so a bit of experimenting is called for. Once it had all been matt varnished I gloss varnished the oil leak at the rear, then dry brushed some of the stones with the base colour and then drybrushed again with matt varnish. I used two tones of grass as a finishing touch, a greener one for most but a browner one for around the oil leak. It took much longer than I’d have liked, an entire Sunday afternoon, but it was probably worth it even if I can’t explain why to my domestic Goddess.
Tags:28mm, afghanistan, Afghanistan: The Great Game, artists pastels, BMP, BMP-3, Imprint Models, iraq, Jihadistan, resin, ruin, rust, rust effect modelmates, Wreck
Posted in Scenics & Props | 1 Comment »
September 6, 2012
 A great weight has been lifted off the shoulders of the workers at Slug Industries seeing as we’ve finally got our latest, and hopefully greatest, model finished. Not a simple one this, with around forty hours on the build alone, seperate moulds for components, and the hot weather mucking up the paintjob on the first cast, but only after full highlighting. In other words a bit of a pain.
 Here’s the first paintjob shortly before a lot of the surfaces simply started to crack. A few attempts at repair later and other cracks and flakes appeared. Casting another and painting that proved to be quicker.
 The rear door which shows the riveting quite well.
 The armoured radiator, which looks flat although it’s made of semi circular tubing, and the Dambuster style headlights. The idea being that they’re adjustable, so you could set a rang to them and when the merged lights lit up a target it’s at the predeterminde range. Probably worth a +1 on any dice roll – if it’s at night.
 The first wheel layout. Ending up putting two extra pairs in after Orkdung over at VBCF quite rightly pointed out how it looked under powered. Figure gives a sense of scale.
Tags:1938, 28mm, AL, Anglican League, armored, armoured, British Union of Fascists, BUF, car, cast, gaming, Goliath, Hastings, interwar, JP1885, model, Ook, resin, slug industires, tank, transport, troop, VBCW, Vehicle, vehicles, Very British Civil War, wargaming
Posted in Projects | 2 Comments »
August 16, 2012
 I’ve had an eye on the Tobsen77 models for a while now, thinking how a good few pieces were well suited to VBCW, but wary of the postal involved. Luckily I’ve been doing some casting for Tobi and managed to wrangle the One Man Army model above. Knowing I was using it for VBCW and being a bit of an engel he not only supplied it with the futuristic gun which is part of the kit he also made me a more suitable gun out of plasti-tube.
 .I left the small spotlight off, and added the vintage car bumper, but the best part was how fast it was to do. Assembled and painted in a leaf pattern over one single short evening. I really like how it looks as if it could have been a conversion of a water boiler.

A cracking little kit and great fun to work on. I’m tempted to have a few more as they work well as a Wooster Dalek declaring “What Ho!” and “I Say!” at the enemy.
Tags:28mm, Anglican League, British Union of Fascists, BUF, gaming, One Man Army, resin, Tobsen77, VBCW, vehicles, Very British Civil War, wargaming, Wooster Dalek
Posted in War Production Report | 2 Comments »
July 18, 2012
 Biased I am, due to having cast these up, but I think this is a lovely little tankette perfectly suited for VBCW even though it’s a yet to be released model for Akula’s Armies so meant for WW1 Fantasy.
 It’s a seven piece resin kit inspired by French FT light tanks and built by Uncle Crouchie who was the man behind BEF miniatures.
 I enjoyed both casting building and painting it but I’m not sure how many might be available so if you’d like one I’d suggest chasing Akula via the link above.

I’m going to have to scrounge another off him myself as I’d like one for my Anarchist band.
Tags:1938, 28mm, Akula's Armies, Anglican League, BEF Miniatures, British Union of Fascists, Crouchie, FT tank, game, gaming, model, resin, tankette, VBCW, vehicles, Very British Civil War, wargaming, ww1, ww1f, ww2, wwii
Posted in Projects | Leave a Comment »
May 11, 2012
 I’m so sorely tempted to start this post with “It was the best of times, it was the worst of times, etc” purely because this is a Tale of Two Bobs. One being my father-in-law who’s been a keen kit modeller ever since there was such a thing. Typically he specialises in aircraft being an ex-brylcreem boy. The other Bob is Bob Winward the man behind Imprint Models and who, as such, we’re about to pour compliments on.
 A few weeks ago I bought an Imprint Warrior from via Empress Miniatures. Being just before Salute 2012 they muddled the order and sent me an LAV instead, but the quality of it was stunning. Then my Warrior turned up which was stunning too but more so because it’s a British vehicle (Hurrah!).
 As usual I showed it to Bob as my latest project on the bench and he was stunned. Mainly it was the quality which he’d though was the domain of kits, finally casting had caught up, but also the price (£22) which is a fraction of what he’d pay for an equivalent kit.
 Always a man to put his money where his mouth is, Bob had me bring up the Imprint web site, saw the model he wanted and gave me the cash there and then to get it for him. It came very quickly and Bob was onto it straight away and he’s done a great job too. You can see for yourself from the pictures.
 I do feel our shared enthusiasm may have spilleth over. I’ve emailed Bob Windward a few times to express how happy I am, and my father-in-law being old school wrote him a letter of gratitude. I do hope he doesn’t think we’re Jehovah’s Modellers trying to drag him into our sinister cult. We can’t recommend them enough, in case you hadn’t seen the sub-text, and expect to see the Warrior up here soon.

Tags:28mm, Bob Windward, Imprint Models, model, modelling, resin, T-72M1, tank, vehicles
Posted in War Production Report | 1 Comment »
May 8, 2012
 One of the most different things about making models for casting rather than just the tabletop is just how much longer it can take. Whereas I can have a model like the one above table ready in just three or four days for casting from it takes at least double if not triple the time to make a master. Thankfully I’ve evolved beyond making masters which get trapped in the mould, so I’m delighted with this one.
 It started with single Hesco blocks. First laid was the first layer, then the second above it, the planking with scribed woodgrain and finally the steps.
 Next came the lower half of the roof, or the table as we came to call it. The only real detail being the woodgrain underneath which you hardly ever see. Well I know it’s there.
 Next was the corrugated roof, but that’s not really protection enough from Terry Taliban’s mortars, so it has to be sandbagged. So a line of sandbags went on, which has to be filled before the next line goes on.
 It starts to look like this but very very slowly…
 Finally got to throw the masters into rubber and lo and behold here’s the very first cast which worked perfectly… phew!
 As did both sections of the roof. A peak of euphoria was reached in 6mil mansions.
 I did take the roof out a little early hence the curve, but married together a neat piece which I hope others will be interested in.
 It’s quite agreeable painted too, although I’m never happy with my drybrushing of the Hesco itself. It takes ages, look passable when it’s inches from your eye but looks a bit scratchy at a distance. Well it does to my hyper-self-critical eyes.
 I’m looking forward to seeing this on the table, it’s big enough to hold five figures or a larger heavy weapons base of figures, and very tough – although my Eureka rocket launcher is on the workbench.
 This model is now availble, unpainted and sans figures, from our humble Slug Industries.
Tags:28mm, afghanistan, building, cast, game, gaming, guardpost, how-to, iraq, Jihadistan, miniatures, modern, resin, sanger
Posted in Scenics & Props | 2 Comments »
April 10, 2012
 Despite the name our humble Slug Industries keeps producing more gaming goodies at a reasonably fast pace producing as it does a model a month on average. The latest is the Art Deco House above, which I’m glad to have finally finished as it’s been a slight horror show from begining to end. Being designed to fit into our old vacuum chamber with just milimeters to spare was difficult enough, but the original idea was for the windows to be cast thin enough to be poked out, however with such a thin mould wall this proved difficult when combined with the actuality of casting resin a milimeter or less in thickness. After a bit of discussion of this over at GWP the general feeling was how this wasn’t really needed. So I thickened the walls, made new moulds and here’s the result. All that remains is to go and mention it on all the best forums, but I imagine on LAF I’ll suffer some random thread derail which will make it all worthwhile.

We just noticed how our humble Fred wasn’t ever listed on the Slug Industries site so we’ve sorted that out, a surprising oversight especially as we’ve sold quite a few of these.
Tags:28mm, Anglican League, armoured motorcar, art deco house, British Union of Fascists, BUF, cast, fred, interwar, resin, Scenics & Props, scratchbuild, slug industires, VBCW, Very British Civil War
Posted in Projects | Leave a Comment »
February 15, 2012
 It’s been quite a productive week here at 6mil mansions. First I bashed out these three small rubble piles, which were very quick after the ruin set which took a full week to put together. The result can be found over at the Slug site.
 Also a couple of pieces I needed for an approaching 6mm game. So rather than just make the pieces for my own use I decided to make pieces I could cast from. This is also handy for my pillbox needs, as I don’t fancy building more than one of them.
 The sharp-eyed amongst you might have noticed how there’s no opening on the bunker, a deliberate step as I wanted it for something a bit different, but I have build a gun port for it, which I’ll attach to a casting and make another mould from, and that’ll be a proper gun toting bunker.

This Radar station is what I wanted, so you can see my thinking. The screen for this was some of that brass etched stuff which is getting cheaper. If you do try something like this my top tip is make sure your brass is totally flat before working it. Mine wasn’t but I added the plastistrip anyway and then I had to flatten both that and the metal.
 Not totally finished though, I’m tempted to come back with a simple camoflage scheme, but it’s ready for a game. Both these pices can also be found over at the other place.
Tags:28mm, 6mm, bunker, pillbox, resin, rubble
Posted in Buildings on Parade, Scenics & Props | 2 Comments »


