Posts Tagged ‘Scenics & Props’
December 18, 2012
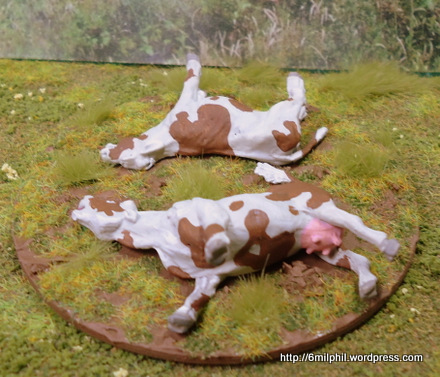 A short post with some poor photos of the Warlord Games dead livestock which I enjoyed painting as the Ayrshire breed, spurred on by them re-releasing them while I still had an unopened blister packet from the original release.
When I first saw these I thought they were a must have. The first dead cattle I recall seeing in a war film were those in Saving Private Ryan during the radar station scene. I’m not certain that was a cinematic first, but it’s what they reminded me of, well that and how many animals get slaughtered during war without much notice.
Tags:28mm, Dead Livestock, figures, gaming, miniatures, model, Scenics & Props, VBCW, Very British Civil War, wargaming, Warlord Games, ww1, ww2, wwI, wwii
Posted in Scenics & Props | 2 Comments »
September 2, 2012
 Filling out the Jihadistan project gave me the chance to paint these rather brilliant Eureka miniatures‘ middle eastern civilians. There’s also a couple of stalls but I haven’t quiet figured out the best way to base those so they can wait. It’s easy to assume how simple figures are simple to sculpt, and the burqa clad ladies might ecourage that train of thought.
 However I already have a couple of burqa wearers and they’re simple figures simply done whereas these have been much better made. Each figure has a distinct attitude in it’s carving making them look more like a moment frozen in time.
 They’re also rather timeless, with the exception of the woman with carrier bags, so could fit in an ancient scenario right up to the modern day. Although I wouldn’t buy anything from the traders I’ll be knocking on Eurekas door again.

Tags:28mm, afghanistan, bazaar, burka, burkha, Burqa, Civilians, Eureka Miniatures, game, gaming, iraq, Jihadistan, miniatures, model, modern, painting, Scenics & Props, wargaming
Posted in War Production Report, Wonderful Waffle | 2 Comments »
August 22, 2012
 These are a few markers for general rubbish and grass tufts which we also use for marking IEDs. The smaller ones are either Skale Scenics field grass or small scraps of metal folded and partially painted, The larger ones are chopped gas cannisters from the ever wonderful Fenris. They’re all based on Fenris laser-cut ply bases. In game they’ve proved very interesting to use. In the first game we used them Daring Dan managed to set one off by driving over it in his very first move, this set a tone of wariness which has only worn off slightly as the majority of them are nothing but markers for grass or rubbish.
Tags:28mm, afghanistan, base, basing, Fenris Games, gaming, gas bottle, gas cannister, IED markers, iraq, Jihadistan, modern, Scenics & Props, Skale Scenics Field grass, wargaming
Posted in Scenics & Props | 2 Comments »
May 10, 2012
 … dear Friends once more. Having built a few compounds for our upcoming Jihadistan campaign one thing became became obvious. The British forces do like to make their way through compound with explosive charges rather than just going through the door. Above is my solution and I think it’s rather elegant for what it is, and better than just a piece of paper with “breach” scrawled on it.
 I’ve made one and cast half a dozen in the hope of the British player not getting carried away with his charges. I may well need some more given the joy a big bang can bring to a game. These are available from Slug Industries.
Tags:28mm, afghanistan, Breach, building, compound, game, gaming, iraq, Jihadistan, Marker, modern, Scenics & Props, Wall
Posted in Scenics & Props | 3 Comments »
April 10, 2012
 Despite the name our humble Slug Industries keeps producing more gaming goodies at a reasonably fast pace producing as it does a model a month on average. The latest is the Art Deco House above, which I’m glad to have finally finished as it’s been a slight horror show from begining to end. Being designed to fit into our old vacuum chamber with just milimeters to spare was difficult enough, but the original idea was for the windows to be cast thin enough to be poked out, however with such a thin mould wall this proved difficult when combined with the actuality of casting resin a milimeter or less in thickness. After a bit of discussion of this over at GWP the general feeling was how this wasn’t really needed. So I thickened the walls, made new moulds and here’s the result. All that remains is to go and mention it on all the best forums, but I imagine on LAF I’ll suffer some random thread derail which will make it all worthwhile.

We just noticed how our humble Fred wasn’t ever listed on the Slug Industries site so we’ve sorted that out, a surprising oversight especially as we’ve sold quite a few of these.
Tags:28mm, Anglican League, armoured motorcar, art deco house, British Union of Fascists, BUF, cast, fred, interwar, resin, Scenics & Props, scratchbuild, slug industires, VBCW, Very British Civil War
Posted in Projects | Leave a Comment »
March 12, 2012
 The latest Jihadistani model is this walled garden. The walls are the usual foamboard mock-plastered with filler. The plants are plastic aquatic ones, but spaced so that figures can get between them. With the more usual gaming trees that’d damage them, but the flexibility of these allows for some movement.
 The world’s worst bricklayer has paid a visit to put these supporting pillars at the gate, a welcome piece of detail for a building like this as they’re typically quite bland.
 There’s also a hole in the wall in one corner with most of the rubble on the inside. A handy entrance, exit, or just somewhere to take a sneaky shot from.
 In another corner a few poppy plants, seeded by the wind I imagine. A straitforward little scenic but it adds a splash of colour to an otherwise dusty scene.
Tags:28mm, afghanistan, building, iraq, modern, Scenics & Props, scratchbuild, Walled Garden, wargaming
Posted in Buildings on Parade | Leave a Comment »
March 6, 2012
 Due to the poppylarity of my home grown opium here’s a stalk-by-stalk guide to making them yourself. I did talk about making them in the previous post but for our hobby cousins who don’t have English as their first language, like say the Americans, a photo how-to demolishes any linguistic barriers. Above is a pin and you’ll need around one hundred of these for a small field. It’s nickel plated brass which means it won’t rust. They’re made in Poland for the Hemline range and you’ll probably want them in various lengths so your field doesn’t look like a row of Guardsmen on parade. The sequins and beads you’ll need should also be available from your local haberdashers.
 Then you have to bend, kink and manipulate the pin to give it a more organic look. You can do this with strong fingers but a small pair of pliers make it both quicker and easier. I did leave a lot straight on my first field, but I think these look better. Be careful though as around one percent of these pins snap, which is also why you do this bending first.
 Then slip on a small glass bead, hold it near the sharp end and add a tiny dob of superglue under the pinhead. Slip the bead up to under the pinhead, hold briefly and then onto the next one.
 However if you want flowering poppies you glue on a concave sequin before the bead and glue it in place. Again it’s quicker to slip the sequin on, hold it near the sharp end, apply glue and then slip it up the shaft.
 Then slip the bead on to the shaft, apply superglue to just under the sequin and put the bead in place.
 Once dried apply a couple of rings of superglue around the shaft. Typically I do a small one near the top, and a broader one at the bottom. Then apply your flock, preferably a long fibre one. Irregularity is key in replicating nature so don’t worry if some have very little flock and some a lot – if all else fails the sparse ones can always go in the middle of the field.
 Repeat the above steps a few times and then you can spray them en masse. The flowering ones will need to have the flowers painted by hand. Bear in mind how Opium poppies are not red like the domesticated variety seen in Europe, They’re typically pale pink. For making into fields I attach thin strips of cork to an MDF base, add filler to make it look more like a field, and then both glue and stab the pins into the cork. Try to vary both the angle and spacing so it look more agriculturally pleasing.
Should you like the look of them, but don’t fancy making them I could be persuaded to make some for you, but they won’t be cheap.
Tags:28mm, afghanistan, DIY, Field, game, gaming, Hemline, how-to, model, modelling, Opium, Personal Use, pins, Poppies, Poppy, Scenics & Props, scratchbuild
Posted in Projects | 3 Comments »
March 5, 2012
 With both modelling and gaming the views of friends and family often veer towards them believing we’re a bit special, but not in a complimentary way. Occasionally that gentle misnomer devolves into a raised state bordering between simple insanity and being found fiddling with a farmyard animal. This project was one of those for me and my family, askew looks, whispering, and pledges of not mentioning it to anyone outside of the immediate tribe. That aside I’m now the owner for a very nifty looking opium poppy field – but be aware its for personal recreational use only.
 Firstly I made a trip to the haberdashers for pins of several sizes and some small glass beads which could be slid on to the pins. These were then superglued to the heads of the pins to make the stalk with it’s capsule and the pin head as the crown. For the few flowering ones I sandwiched a sequin between the bead and the pin head. Once dried I ran two or three bands of superglue around the shaft of the pin and flocked it with a long fibrous flock. These were then sprayed and stuck into the furrows which are strips of cork glued onto an MDF base. A small amount of more flock around the base et voila!
 mThere’s just shy of one hundred pins on this quite small field, but it’s a handy game prop and I may even make another – and then onto maize!
A photo how-to make these is available here.
Tags:28mm, afghanistan, how-to, model, modelling, Opium, Poppies, Scenics & Props, scratchbuild
Posted in Scenics & Props | 5 Comments »
March 2, 2012
 This was a very quick build using foamboard, filler, PVA glue and a few pins and set on a piece of MDF to add a little weight.
 For the shutter I scored the card on one side of a piece of foamboard, then peeled away the foam and bent the shutter to shape and doped it with a little liquid superglue.
 For gaming simplicity the roof comes off, it could have been fixed but as you, gamers, know that’s just asking for trouble when someone wants to get a figure inside or even forgets there’s a figure in there and it’s found a week later battered and bruised from being moved with a scenic.
 One end is delicately ruined with plenty of room for figures, and a small hole in the wall for the occasional sniper.
 Although probably one of the simplest buildings I’ve ever made I think it’s a little cracker. I may well add open shutters to the other shops because it’s a small detail which brings it to life.
Tags:28mm, afghanistan, bazzar, building, foamboard, gaming, iraq, market, model, modern, Scenics & Props, scratchbuild, wargaming
Posted in Buildings on Parade | 1 Comment »
February 29, 2012
 The great compound building spree starts to grind to a halt as all three near completion, spurred on by me discovering Channel 5’s “Royal Marines: Mission Afghanistan” on demand via the Xbox and boring the whole family with episodes back-to-back, leaving them feeling like they’ve done a tour themselves but in a single Sunday.
 My idea was to cast a building several times and in laying it out differently make a village which didn’t look like a housing estate. Having managed a trio to start with I must admit the roofs done this way is not as good as the way I did it before. Not sure why I changed style, some half-arsed idea about doing seperate roofs for added variety I recall. It didn’t really work did it?
 Roof problems aside I’m happy with how much this speeds up making compounds, as the walls are simple. Above they are made from foam board carved for irregularly, boshed with filler and a light sanding
 For this one I’ve added a dome on the roof, more of a gaming tradition than anything I’ve actually seen in photos.
 The walls have been made differently on this one reflecting an observation on the different styles of Afghani walls. Many seem to have been made with large dried mud bricks, which is then rendered with a coating of mud. This often crumbles in places but the brick pattern is still slightly visible.
 The effect has worked and was made easy by using Cork Expansion Gap Inserts, or strips of cork to you and me. I’ve seen these in Wickes for around six quid a packet, which as a modelling material is well priced. However my Domestic Goddess found me a pack in the PoundlandQuidKingdomNinetyNinePee shop and there’s miles of it. Hurrah for marriage!
 I’ve then cut these to brick size and laid them into walls, taking care to make the walls based on the brick size to keep it simple.Then the usual rendering with filler and a light sanding.
 This is the final one and I fancied something a bit different, so it’s set on a slight mound, has a smaller yard and the gate is on the corner with a few steps down. One corner of the roof is missing and there’s a small hole in the rear, ideal for snipers.
 It also has the bricked walling which blends fairly well with the more regular irregularity of the building’s wall. It has a fair amount of height to it and therefore more variety.
 Together this trio works well, so I’m looking forward to putting them down with the other four. I have one more casting in hand at the moment but having started a wrecked market from seeing one on Royal Marines: Mission Afghanistan” it’ll just have to wait.
 There’s some small detailling left on these but I got so excited with them I couldn’t wait to post them up. A feeling I imagine you share.
Tags:28mm, Afghan, Afghani, afghanistan, building, compound, Compounds, model, modelling, modern, Scenics & Props, scratchbuild, wargaming
Posted in Buildings on Parade | 1 Comment »


