 Following a comment from fellow blogger Ssendam asking about my basing technique I thought it would make much more sense to show it rather than explain it, and it’s one of those things a lot of us seasoned gamers do without thinking and it’s not obvious to newcomers to the wonderful hobby of wargaming. Above is a GHQ German Horsedrawn Wagon painted and washed superglued onto a plastic base after it has been roughly textured with green putty or milliput – green putty drys much quicker but pongs and can remove paint, milliput takes much longer to dry but can be sculpted and can be painted before fully dried. Once dried the base has been painted with Vallejo Flat Earth, and then roughly drybrushed with any other darker brown. A small stone has been superglued on for added detail.
 If you want to add a little more depth to the brown, like you might on a very muddy base, add a dark wash. You might have noticed how I’m using brown before adding the grass, whereas a lot of folk use green. This is a personal preference borne of knowing how after a few years flock can fall off and this way it reveals the mud below, combined with liking quite rough looking bases with a lot of soil showing.
 For flock I typically use three different types based on the palette I want to use across an entire project. Given that this project is Europe ’44-’45 I decided to go for a high summer look. Above is a blurred image of my dark green flock, but it still functions to give an idea of the colour, which I mixed from three bags of rather posh flock from EMA. It’s meant to represent the best kept lawns you might find.
 Here’s my light mix, a combination of several bags of Javis flock which is typically spongier, mixed with a little of the EMA dark stuff. This is meant to represent sun-bleached grass.
 Here’s my mid-range tone everyone’s favourite static grass. It comes as this wide spectrum of colours ready mixed.
 Back to the wagon and here’s the first coat of PVA glue sparingly dotted around. Now I’m after a patchy effect, so I add each layer in patches. For thicker or more regular grass you use thicker or more regular coats of glue.
 Then as speedily as you can pile on the first layer of flock, here it’s the darkest one. I’ve gently tapped it down, and then tapped off the bulk of the excess. Now at this stage, before the glue dries, if you leave it as shown the glue will spread and when dried most of this flock will stay on the base. It’s totally acceptable as it is, but I want a bit more soil showing.
 So I wait less than a minute and then blow off the whole of the excess flock. This is much more what I’m looking for.
 Having let the first layer dry completely, I now add the second coat of PVA glue. Again this is patchy, some on bare soil some on the flock already there.
 On goes the light mix, follow the same procedure as previously to get the look you’re after.
 I decided on a bush, which I added before the static grass, using Javis bush material. Again this is a mix of two tones from seperate bags, chopped roughly together. To attach to the base I use superglue gel, into which I press a large pinch of the Javis hedge mix. When dried you can, should you choose, pluck and form a good looking bush which you can then set with a little liquid superglue gently poured onto the top branches. This, like the PVA glue will produce some shine, all of which will vanish once you matt varnish the base in it’s entirity.After the bush I put a few blobs of PVA around for the final layer, the static grass.
 Here’s the near finished base, it just needs a matt varnish, which I’ve not done as I spray my bases en-masse. Obviously using three types of flock triples the time it takes to finish each base but I think the finished look is worth it. It is worth experimenting as you go along, to get the kind of finish you’re after, one thing worth considering is mixing near identical shades of flock, for 6mm scale it produces the kind of detail you need for realism on such a delicate scale.
 Happy coincidences are always welcome, especially when they produce figures which fit into somewhere the manufacturer didn’t intend. These modern figures from Hasslefree fit quite neatly into the world of the popular game “Battlefield 3”. For a player of that game, like me, it does make them irresistable. The figures are very similar but have a choice of two main weapons and seperate heads. Giving them different paintjobs makes them look less similar so that’s the course I took.
 These come on slotta bases, and like a lot of the smaller producers it’s a restriction which the sculptors strive to escape from. Kevin White is no different in this aspect and the miniatures feet are barely in contact with the slotta bar. As I base on tuppences having such a small area of contact between figure and base can be a problem.
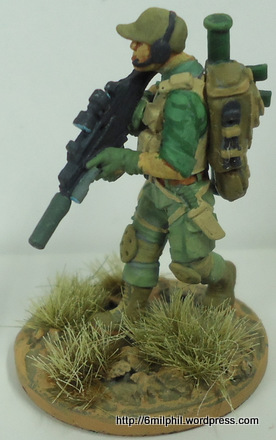 Not wanting to repeat problems I’ve had before when totally removing the slotta bar I decided on a new angle and this was to cut away the bulk of it leaving just a thin strip. This gives a lot more contact area but also allows the lightness sculpted in to the piece. Worth a try and a lot quicker than pinning.
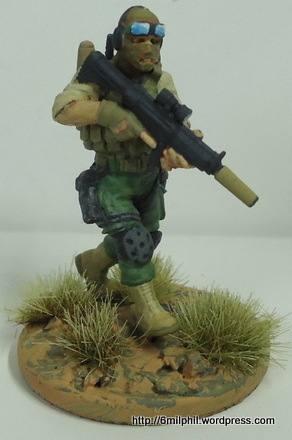 In the computer game the troops have a very loose dress code, so rather than try to replicate a scheme I decided to just go for the gneral Battlefield Casual look which they all seem to have. I’m happy with the finish althoug, yet again, the photos have me sucking my teeth at the touches of dust, the odd wrong dab, etc, which only becomes apprent at this size. Good news is it distracts me from any blurry photos.
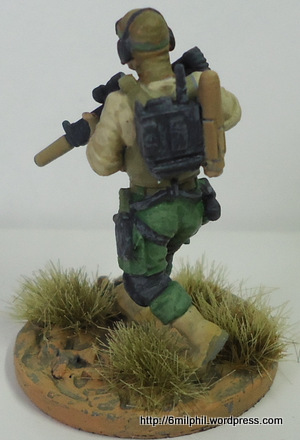 Hasslefree are about to release another pair in this series, and I suspect they’ll be as animated, well detailed and generally brilliantly sculpted as we’ve come to expect. A must-paint.


 No I’m not on the wacky baccy, above is the mix of flocks I’m currently using for bushes. The photo doesn’t show the tones well but take my word for it there’s two tones of Javis bush material and one of another make which I can’t recall. I thought I’d take the opportunity to show how I make bushes, either for bases of miniatures, or scenics.
 Here’s the base I want to put a bush on. I’ve chopped the bush mix really quite fine and have it nearby, so I’ve added a blob of superglue gel near the fence post on the base. Then I take a very large pinch of bush mix and squeeze it between thumb and finger to really compress it, then press the whole lot down onto the glue, hold it briefly in place and then whisk my digits away to avoid becoming glued to the base.
 This produces a reasonable looking bush as you can see. It can be left like this or pushed and prodded around with the point of a pencil. Often this produces a bushier than bush look but you can tell it’s won’t hold for long.
 To make it set in position I then add a single drop of liquid superglue, which the material then sucks up and when dry is much tougher. If you do add this second touch and add too much liquid superglue there’s a danger of the bush drying out with a white finish to it. It’s very much a matter of putting on too little rather than too much, and the only way to figure that out is to practice.
 Well I’ve finally finished what remained of my armies for this WW2, and about bleeding time too. Every thing after this is a luxury, so I can concentrate on a few scenics and the whole point of this activity tons of games. Hurrah! There’s a bit of work due on the storage front but by all estimations I should have these all stored away in time for… well in time to get them out for a game next weekend so long as tine is willing as we’ve off to the
  The best of the latest are the command bases above, again going for more of a mini-diorama look than a typical base.
 This is the British Para Command base, with them taking cover behind a fence.
 Likewise for the German Infantry Command, well I had half a fence section left, plus the luxury of a Kettenkrad.
 Meanwhile the German Paras have choosen a more rural setting, covering behind a haywagon.
 One of the regular bases with a bit of detail is this of a Tommy HMG crew legging it through long grass. As nice as these and the others look, and as happy as I am to have them finally finished I must admit I’ve grown sick of basing infantry over the past week.