Posts Tagged ‘modelling’
December 19, 2012
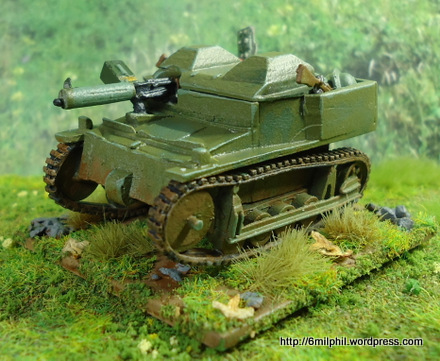 Having a sort through the lead mountain is always a joy, forgotten pieces are revealled with all the excitement from buying them in the first place. This Carden Loyd universal carrier is made by Reiver Miniatures and I picked it up at Salute 2011 while having a natter with Red Rich who’d put on that year’s VBCW game.
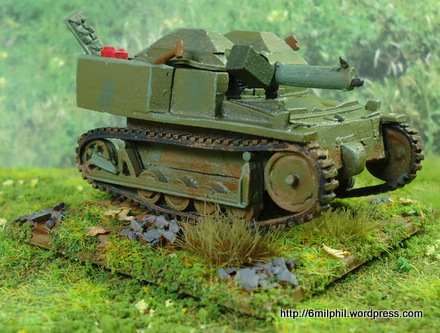 It’s a crisp solid metal casting and surprisingly solid for such a small model. It’s few pieces, the chassis, the lid, two tracks and a Vickers HMG. The chassis has a couple of notches so you physically can’t put the tracks on the wrong way around, a smart touch. The Vickers doesn’t have an ammo box, but it’s simple enough to add one and yes it really does go on at that jaunty angle. Not so with the tripod which usually goes on the driver’s side of the “bonnet”. It would be a folded one and I don’t have any of those in my scraps box so I left it off.
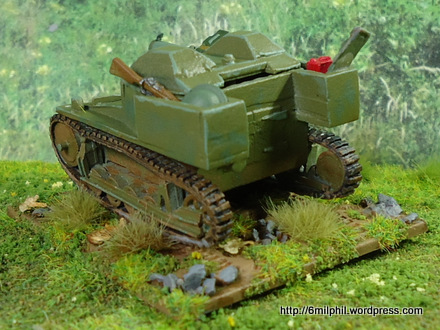 I’d rather not base vehicles like this but I did think it’d get whalloped in game so a base was a must. I used the ever wonderful milliput for the ground so I could press the models tracks into it and have trackmarks, if you’re doing this it’s best to do it with the bare metal piece, but if you only think of it after painting you need to get both pieces damp to avoid problems.
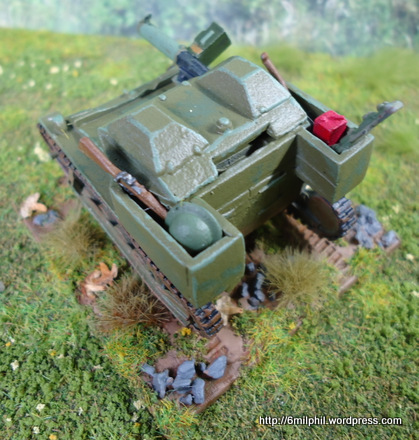 I wanted to put a few pieces in the stowage bins, so I used various pieces from the Warlord Games plastic British sprues plus a white metal petrol can. I’m pleased with it, should I do another one I’d do it with the lid propped up and a full crew.
Tags:1938, 28mm, Carden Loyd, game, gaming, interwar, model, modelling, Reiver Castings, tankette, universal carrier, VBCW, vehicles, Very British Civil War, wargaming, ww2, wwii
Posted in War Production Report | Leave a Comment »
November 29, 2012
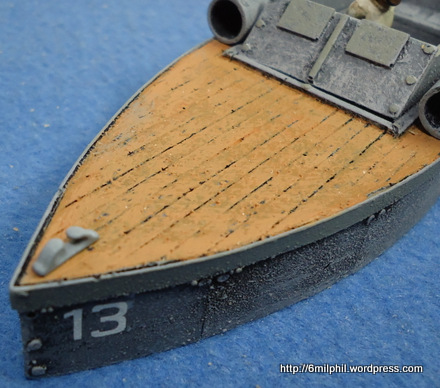
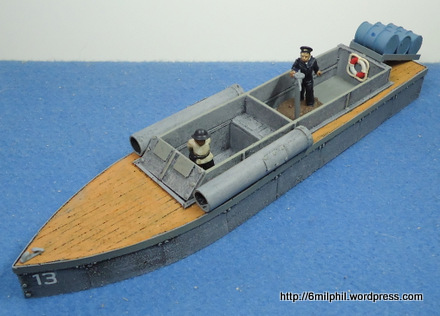 Recently I traded with the cosmopolitan Akula for the remnants of his naval forces from his VBCW project. Some of you might recall how he built an eight foot long aircraft carrier, thankfully that wasn’t part of the deal. I originally thought it was just a few figures, but it turned out to be an entire navy plus a couple of Torpedo Boats by PMC games.
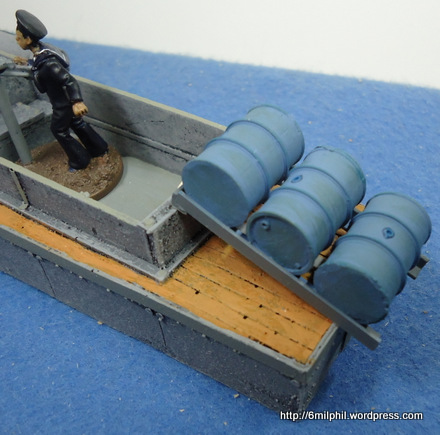 A few pieces have been added, namely a splash of brown paint to bring the decking to the fore, a ships wheel, decal numbers, a lifebelt, a cleat on the bow, and to gun them up a little with a rack of three depth charges. I did look into getting a couple more PMC nautical pieces but it proved fruitless.
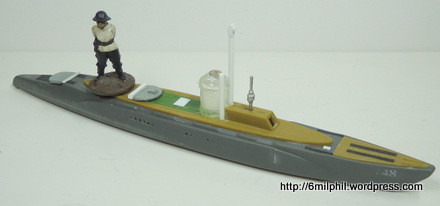
 Of course two boats do not a navy make, so I’ve started on a midget two man submarine, which can be seen in it’s current state below. I’m still sourcing torpedos for it but expect to see a post about it once finished. The base structure is a toy submarine, Micro Machines perhaps, with the main conning tower hacked off. The fore structure had enough room to cut a window in so expect a face to be peering out of it.
I’m also going to scratchbuild a Clyde Puffer having finally tracked down some basic plans which were free. All will be kept clean of flags and nation marks so they can be used in a variety of game not least both VBCW and WW2. Full steam ahead!
Tags:28mm, game, gaming, Midget Submarine, miniatures, model, modelling, PMC Games, Torpedo Boat, VBCW, vehicles, Very British Civil War, wargaming, ww2, wwii
Posted in War Production Report | 2 Comments »
October 17, 2012
 Here’s a couple more Afghan support weapons by Eureka which I picked up at Salute 2012. They’re the usual joy to paint, even if my photos aren’t very good. The recoiless rifle is on a very big base, and there’s a big space near the loader because the ammo box wasn’t in the bag.
 Thankfully Nic at Eureka was happy to send me one all the way from Australia, not that I’ve had time to paint and add it. The weapon was a little tricky to get together right but plenty of testing was the way to do it, with gentle tweaks to get the legs of the two-part tripod the right height.
 Here’s the Eureka Afghan mortar, which has one figure sculpted so you can set him up with his hand in the ammo box. Well I was impressed. A much tighter fit on the base which I prefer.
 Again a slightly tricky assembly of the weapon with three pieces which have to be glued simultaneously as I see it. Should you glue the tube into the base plate seperately it might not fit onto the bipod without being too splayed. Tricky but not impossible.

Again a fine example of the brilliance of digital photography is the small hair on the base plate while making everything else slightly blurred. The hair has since been removed, imprisoned and under going severe interrogation.

Tags:28mm, Afghan, afghanistan, Eureka Miniatures, Fighting 15s, figures, game, gaming, iraq, Jihadistan, miniatures, model, modelling, modern, Mortar, paint, recoiless rifle, wargaming
Posted in War Production Report | 3 Comments »
September 24, 2012
 It was the yearly pilgrimage to Folkestone for the talent showcase which is Euro-Militaire on Saturday and the Boy Slug, Captain Stinky and myself dutifully made our way down there bathed in sunshine. Although the quality gap between modellers and gamers work is shrinking year on year there is one glaring difference between the two, namely the price of everything. Model kits and accessories are hair-whiteningly expensive in comparison but the modellers don’t seem to mind. Big thanks to the ladies on the door for their friendly welcome, although I do think many visitors don’t bring themselves to say “Good Morning” to them. Why I couldn’t say.
Bumped into Jason Salkey, who is well-known to Salute visitors, otherwise known as Rifleman Harris from the TV series Sharpe’s Rifles, also chums Daring Dan, Fascist Child Killer Tony and a few lads from the local gaming club. The most intriguing stall was the Airfix one showing their much anticipated 1/48th modern British models, which were very nice but they just had a display and not a single one for sale.
Despite the great organisation and obvious efforts by all involved a couple of gripes remain. One is the number of visitors who insist on wearing large rucksacks in a well attended and therefore crowded show. Typically they move as if they weren’t wearing them, sending the uninitiated flying. Regulars have in turn developed their own techniques for dealing with them from braced standing to returning shoves and it doesn’t help the atmosphere. The second is the lighting in the display and competition rooms, which is only a problem if you’re taking photographs – and there’s a lot of folk snapping away. Gripes aside it’s a cracking show and as the European wide attendance shows it’s worth making the effort to pay it a visit.
Here’s just over a hundred photos from the weekend, mainly stuff which took my eye, had reasonable light and wasn’t too crowded to get near.
Should anyone know the story behind the photo of Ken’s Cup, featured above, I’d love to hear it.
Tags:2012, Diorama, Euro Militaires, Folkestone, Leas Cliff Hall, modelling, Models, painting
Posted in Wonderful Waffle | 2 Comments »
May 14, 2012
 This perfectly scaled beauty is the Imprint Models “Warrior” which I hastened to finish after my dad-in-law got this tank done very quickly. This model comes with the extra armour which is standard now, but if you wanted an older version you just leave it off. There’s also a pair of draped camo nets supplied which I choose not to fit.
 Again the quality is top notch making the entire experience enjoyable. Even thing fits together well with only a little bit of extra effort to fit the armour up kit. Unlike the T72-M1 all the hatches are seperate, so you can fit crew if thats preferred over the buttoned-up version.
 I’ve used Brookes Miniatures WMIK crews from Old Glory UK – they’re well priced and can be hacked to suit. I’ve painted the driver as Johnson Beharry prior to his Victoria Cross.
 Effectively it’s the last vehicle for the regiment and it fits in well as a father figure to the smaller vehicles.

Tags:28mm, afghanistan, British, Brooks Miniatures, Desert, game, gaming, IFV, Imprint Models, iraq, Jihadistan, Johnson Beharry, model, modelling, modern, Old Glory UK, painting, Vehicle, vehicles, Warrior
Posted in War Production Report | 6 Comments »
May 11, 2012
 I’m so sorely tempted to start this post with “It was the best of times, it was the worst of times, etc” purely because this is a Tale of Two Bobs. One being my father-in-law who’s been a keen kit modeller ever since there was such a thing. Typically he specialises in aircraft being an ex-brylcreem boy. The other Bob is Bob Winward the man behind Imprint Models and who, as such, we’re about to pour compliments on.
 A few weeks ago I bought an Imprint Warrior from via Empress Miniatures. Being just before Salute 2012 they muddled the order and sent me an LAV instead, but the quality of it was stunning. Then my Warrior turned up which was stunning too but more so because it’s a British vehicle (Hurrah!).
 As usual I showed it to Bob as my latest project on the bench and he was stunned. Mainly it was the quality which he’d though was the domain of kits, finally casting had caught up, but also the price (£22) which is a fraction of what he’d pay for an equivalent kit.
 Always a man to put his money where his mouth is, Bob had me bring up the Imprint web site, saw the model he wanted and gave me the cash there and then to get it for him. It came very quickly and Bob was onto it straight away and he’s done a great job too. You can see for yourself from the pictures.
 I do feel our shared enthusiasm may have spilleth over. I’ve emailed Bob Windward a few times to express how happy I am, and my father-in-law being old school wrote him a letter of gratitude. I do hope he doesn’t think we’re Jehovah’s Modellers trying to drag him into our sinister cult. We can’t recommend them enough, in case you hadn’t seen the sub-text, and expect to see the Warrior up here soon.

Tags:28mm, Bob Windward, Imprint Models, model, modelling, resin, T-72M1, tank, vehicles
Posted in War Production Report | 1 Comment »
April 21, 2012
 As this post was published the doors have just opened for Salute2012 and if you’re reading this shortly afterwards then you’re probably not lucky enough to be there – unless you’re reading this on some smart device as you line up outside. This humble project is for the Frothy Racers game being run by UncEvl at table GB05, the idea behing the game being a mix of the film Ben Hur and the Wacky Races cartoon. I thought I’d do Benny Hill’s “Ernie” charactor thus bringing a hint of VBCW to it. Above are the basic pieces, a diecast milk cart, a pair of horses which I scrounged off a web chum, and the base lovingly handcrafted by UncEvl himself.
 Ernie is an adapted Black Cat Bases Pianist sans stool and piano, to this I added spectacles (even though Benny Hill did the video for the song without them, I thought they where iconic and hence vital), a cap, an apron, and a cash bag.
 These painted up rather nicely, and I’m happy to have secured cart horses with proper plough harnesses. Finding the horses was quite difficult as most miniature horses are for cavalry and have tack for riding and saddles.
 I did the milk cart in a racing red as this is set to race some quite scary looking vehicles. Knowing how the scariest folk are usually the weakest this is a deliberate ploy to shatter their morale.
 Fully painted and based including two crate of silver top and one of gold top. The yoghurts for her at number 22 are inside, so out of view.
 The signs were print outs on to coloured paper, which means no nasty white edges to deal with. They’re not perfect but narcissism must take second place occasionally.
 This rear view is what the rest of the field will see most of… I hope.
Tags:28mm, Benny Hill, Ernie the fastest milkman in the west, figures, Frothers, Frothy Racers, game, gaming, horse drawn, milk cart, miniatures, model, modelling, Salute 2012, VBCW, vehicles, Very British Civil War
Posted in Projects | Leave a Comment »
March 6, 2012
 Due to the poppylarity of my home grown opium here’s a stalk-by-stalk guide to making them yourself. I did talk about making them in the previous post but for our hobby cousins who don’t have English as their first language, like say the Americans, a photo how-to demolishes any linguistic barriers. Above is a pin and you’ll need around one hundred of these for a small field. It’s nickel plated brass which means it won’t rust. They’re made in Poland for the Hemline range and you’ll probably want them in various lengths so your field doesn’t look like a row of Guardsmen on parade. The sequins and beads you’ll need should also be available from your local haberdashers.
 Then you have to bend, kink and manipulate the pin to give it a more organic look. You can do this with strong fingers but a small pair of pliers make it both quicker and easier. I did leave a lot straight on my first field, but I think these look better. Be careful though as around one percent of these pins snap, which is also why you do this bending first.
 Then slip on a small glass bead, hold it near the sharp end and add a tiny dob of superglue under the pinhead. Slip the bead up to under the pinhead, hold briefly and then onto the next one.
 However if you want flowering poppies you glue on a concave sequin before the bead and glue it in place. Again it’s quicker to slip the sequin on, hold it near the sharp end, apply glue and then slip it up the shaft.
 Then slip the bead on to the shaft, apply superglue to just under the sequin and put the bead in place.
 Once dried apply a couple of rings of superglue around the shaft. Typically I do a small one near the top, and a broader one at the bottom. Then apply your flock, preferably a long fibre one. Irregularity is key in replicating nature so don’t worry if some have very little flock and some a lot – if all else fails the sparse ones can always go in the middle of the field.
 Repeat the above steps a few times and then you can spray them en masse. The flowering ones will need to have the flowers painted by hand. Bear in mind how Opium poppies are not red like the domesticated variety seen in Europe, They’re typically pale pink. For making into fields I attach thin strips of cork to an MDF base, add filler to make it look more like a field, and then both glue and stab the pins into the cork. Try to vary both the angle and spacing so it look more agriculturally pleasing.
Should you like the look of them, but don’t fancy making them I could be persuaded to make some for you, but they won’t be cheap.
Tags:28mm, afghanistan, DIY, Field, game, gaming, Hemline, how-to, model, modelling, Opium, Personal Use, pins, Poppies, Poppy, Scenics & Props, scratchbuild
Posted in Projects | 3 Comments »
March 5, 2012
 With both modelling and gaming the views of friends and family often veer towards them believing we’re a bit special, but not in a complimentary way. Occasionally that gentle misnomer devolves into a raised state bordering between simple insanity and being found fiddling with a farmyard animal. This project was one of those for me and my family, askew looks, whispering, and pledges of not mentioning it to anyone outside of the immediate tribe. That aside I’m now the owner for a very nifty looking opium poppy field – but be aware its for personal recreational use only.
 Firstly I made a trip to the haberdashers for pins of several sizes and some small glass beads which could be slid on to the pins. These were then superglued to the heads of the pins to make the stalk with it’s capsule and the pin head as the crown. For the few flowering ones I sandwiched a sequin between the bead and the pin head. Once dried I ran two or three bands of superglue around the shaft of the pin and flocked it with a long fibrous flock. These were then sprayed and stuck into the furrows which are strips of cork glued onto an MDF base. A small amount of more flock around the base et voila!
 mThere’s just shy of one hundred pins on this quite small field, but it’s a handy game prop and I may even make another – and then onto maize!
A photo how-to make these is available here.
Tags:28mm, afghanistan, how-to, model, modelling, Opium, Poppies, Scenics & Props, scratchbuild
Posted in Scenics & Props | 5 Comments »
February 29, 2012
 The great compound building spree starts to grind to a halt as all three near completion, spurred on by me discovering Channel 5’s “Royal Marines: Mission Afghanistan” on demand via the Xbox and boring the whole family with episodes back-to-back, leaving them feeling like they’ve done a tour themselves but in a single Sunday.
 My idea was to cast a building several times and in laying it out differently make a village which didn’t look like a housing estate. Having managed a trio to start with I must admit the roofs done this way is not as good as the way I did it before. Not sure why I changed style, some half-arsed idea about doing seperate roofs for added variety I recall. It didn’t really work did it?
 Roof problems aside I’m happy with how much this speeds up making compounds, as the walls are simple. Above they are made from foam board carved for irregularly, boshed with filler and a light sanding
 For this one I’ve added a dome on the roof, more of a gaming tradition than anything I’ve actually seen in photos.
 The walls have been made differently on this one reflecting an observation on the different styles of Afghani walls. Many seem to have been made with large dried mud bricks, which is then rendered with a coating of mud. This often crumbles in places but the brick pattern is still slightly visible.
 The effect has worked and was made easy by using Cork Expansion Gap Inserts, or strips of cork to you and me. I’ve seen these in Wickes for around six quid a packet, which as a modelling material is well priced. However my Domestic Goddess found me a pack in the PoundlandQuidKingdomNinetyNinePee shop and there’s miles of it. Hurrah for marriage!
 I’ve then cut these to brick size and laid them into walls, taking care to make the walls based on the brick size to keep it simple.Then the usual rendering with filler and a light sanding.
 This is the final one and I fancied something a bit different, so it’s set on a slight mound, has a smaller yard and the gate is on the corner with a few steps down. One corner of the roof is missing and there’s a small hole in the rear, ideal for snipers.
 It also has the bricked walling which blends fairly well with the more regular irregularity of the building’s wall. It has a fair amount of height to it and therefore more variety.
 Together this trio works well, so I’m looking forward to putting them down with the other four. I have one more casting in hand at the moment but having started a wrecked market from seeing one on Royal Marines: Mission Afghanistan” it’ll just have to wait.
 There’s some small detailling left on these but I got so excited with them I couldn’t wait to post them up. A feeling I imagine you share.
Tags:28mm, Afghan, Afghani, afghanistan, building, compound, Compounds, model, modelling, modern, Scenics & Props, scratchbuild, wargaming
Posted in Buildings on Parade | 1 Comment »