Archive for the ‘Scenics & Props’ Category
December 18, 2012
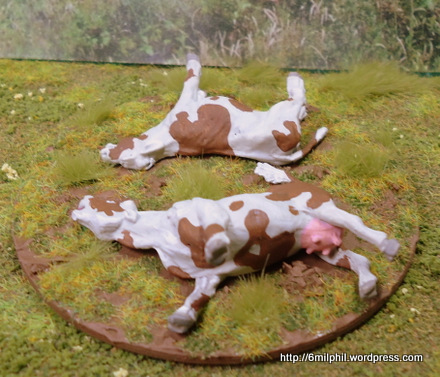 A short post with some poor photos of the Warlord Games dead livestock which I enjoyed painting as the Ayrshire breed, spurred on by them re-releasing them while I still had an unopened blister packet from the original release.
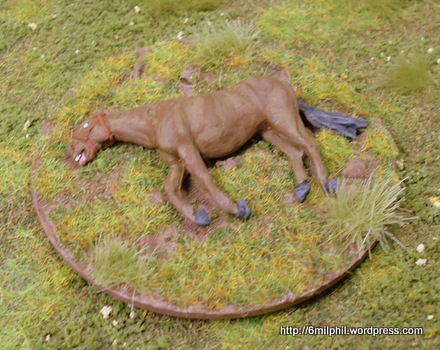
When I first saw these I thought they were a must have. The first dead cattle I recall seeing in a war film were those in Saving Private Ryan during the radar station scene. I’m not certain that was a cinematic first, but it’s what they reminded me of, well that and how many animals get slaughtered during war without much notice.
Tags:28mm, Dead Livestock, figures, gaming, miniatures, model, Scenics & Props, VBCW, Very British Civil War, wargaming, Warlord Games, ww1, ww2, wwI, wwii
Posted in Scenics & Props | 2 Comments »
October 16, 2012
 Back in May there was a fine two-part documentary on the BBC featuring Rory Stewart called ” Afghanistan: The Great Game.” which not only brought forth an educated perspective on the country but also offered some stunning imagery. One instance was a couple of Soviet vehicles in the spot they were destroyed during the 80’s rusted into a memorial of bad times past. I thought a similar model would suit my gaming table.

Of course my first concern was the idea of paying for a model and effectively turning it to a non-playable piece of junk. Then I remembered how Bob over at Imprint Models not only did stunning models, but he also has a number of miscasts available at a lower price. I wanted an APC rather than a tank so emailed the man himself and yes, he had some BMP-3’s available. Ура! The condition of the model was impressive for a miscast and wouldn’t take too much work to make a fine model for playing with. With a solid lump of resin as it is there’s no opportunity to make great holes or hollows in it, so the first thing to do was to hack off most of the track from one side. Some of this I reattached to have some hanging track on the front., some went onto the base and some I simply lost.
 Having this sitting flat wasn’t going to work so I make a base with a slope so one side would sit higher than the other, and also have some of the remaining track buried under pebbles. The vehicle and the base had to be done seperately, then joined and some additional work done to finish it.
 I did add some small damage, namely several bullet holes on one side, and a larger RPG one on the other side. Some folk might think it looks too small but I remember watching a Mujahadeen video many years ago of an attack on Russian armoured vehicles and a succesful RPG hit which appeared to my naive eyes to be lttle more than a loud DONK! The small hole it produced did bring the vehicle to a halt and as the cameraman approached still filming it became obvius how the entire crew had died instantly…
 For the rust effect I wasn’t sure what to use so I asked over at Frothers and Freakinacage recommended Modelmates Rust Effect, and once he explained it was a single application effect whereas a lot of rust effect kits are lots of stages with a pot for each. It’s not cheap but it does a stunning job. My key point would be to use it as thinly as possible, but there’s a tutorial via the link above. I really recommend it, great effect with the added joy of being a bit like finger-painting which is always fun given how tightly figures have to be painted.

For additonal rust an old favourite was used, artists pastels. These are messy but are worth it, if you decide to use them consider going for really light tones. Once varnished they go darker so a bit of experimenting is called for. Once it had all been matt varnished I gloss varnished the oil leak at the rear, then dry brushed some of the stones with the base colour and then drybrushed again with matt varnish. I used two tones of grass as a finishing touch, a greener one for most but a browner one for around the oil leak. It took much longer than I’d have liked, an entire Sunday afternoon, but it was probably worth it even if I can’t explain why to my domestic Goddess.
Tags:28mm, afghanistan, Afghanistan: The Great Game, artists pastels, BMP, BMP-3, Imprint Models, iraq, Jihadistan, resin, ruin, rust, rust effect modelmates, Wreck
Posted in Scenics & Props | 1 Comment »
October 3, 2012
 This sublime Donkey Mill is another one of those timeless pieces which would fit a wide period of games, ancient to modern and be a great addition to them all. I’d seen the Architects of War Middle East range some time ago and always wanted to see it up close before parting with any shekels. I found this piece at Red Knight when they still had a shop and jumped on it immediately. With my upcoming Jihadistan game at a soon to happen show I finally pulled this out of the to-do pile.
 The pack contains four pieces, the mill and ground as a single pre-coloured in brown resin piece, the millstone, the wood and the donkey all in pewter. As with most simple kits it’s also a little tricky. The millstone and the wooden upright have to be straight on the vertical while the horizontal beam has to meet the donkey’s harness properly. A tiny bit of tweaking was needed on the beam to get this right and i found the easiest way to assemble once painted was to hold it all in place and with my third hand glue the donkey into place first.
 Corn was what I wanted being ground. So I gingerly picked out two shades of yellow from mixed flock packs with the agility of a diamond buyer with a date with Kiera Knightly. This was glued onto the mill and into the sacks before assembly. To harden it up I doped it with superglue, as it dried the two-tone yellows went dull brown, well two-tone brown. So had to be dry brushed with yellow to brings it back to life.

It was fun to paint, I imagine some might think the donkey is too small but foreign ones typically aren’t as healthy no9r as big as the seaside donkeys we see most offen. Can’t wait to get another piece from these folk.
Tags:28mm, afghanistan, Architects of War, Donkey, iraq, Jihadistan, ME006, Middle East, Mill, north africa
Posted in Scenics & Props | Leave a Comment »
August 22, 2012
 These are a few markers for general rubbish and grass tufts which we also use for marking IEDs. The smaller ones are either Skale Scenics field grass or small scraps of metal folded and partially painted, The larger ones are chopped gas cannisters from the ever wonderful Fenris. They’re all based on Fenris laser-cut ply bases. In game they’ve proved very interesting to use. In the first game we used them Daring Dan managed to set one off by driving over it in his very first move, this set a tone of wariness which has only worn off slightly as the majority of them are nothing but markers for grass or rubbish.
Tags:28mm, afghanistan, base, basing, Fenris Games, gaming, gas bottle, gas cannister, IED markers, iraq, Jihadistan, modern, Scenics & Props, Skale Scenics Field grass, wargaming
Posted in Scenics & Props | 2 Comments »
June 11, 2012
 This piece developed from me wanting to do a Steptoe & Son styled junk yard. After some small thought I decided the scope for the use of that as a scenic was rather limited so instead tried a piece which was all junk but suitable for a whole range of periods, so from the 1930’s through WW2 to modern day and beyond.
 It started with the shell of an old diecast Rolls Royce, but that might date it too much so it was time to put it on blocks and cover it with a tarpaulin. The steam tractor wheels were ripped off a diecast which didn’t fit 28mm, and the barrels are the damaged ones from Fenris. Most of the other parts are from the scraps box.
 The rust is far too many shades of reddy brown, progressively mixed lighter and topped off with pastels. The great thin about pastels is how you can grab a couple of vibrant and perfect rust shades for a couple of quid and the effect is lovely. The big problem is they’re pastels.
 If you haven’t used them before be prepared to get covered in them, and ready to varnish quickly before the colour spreads – which it will given half the chance. Once varnished clean everything involved including yourself but also watch out for everything you touched, like the nozzle of the varnish. Otherwise it’ll sit there waiting for you and suddenly you’ll have it on your fingertips just as you’re handling another paintjob. You have been warned!
 The leakage from the barrels is a dark grey paint mixed with PVA. This has a nice gloopy quality to it as well as a fine shine.
Tags:Fenris Games, junk, model, pastels, rust
Posted in Scenics & Props | 2 Comments »
May 10, 2012
 … dear Friends once more. Having built a few compounds for our upcoming Jihadistan campaign one thing became became obvious. The British forces do like to make their way through compound with explosive charges rather than just going through the door. Above is my solution and I think it’s rather elegant for what it is, and better than just a piece of paper with “breach” scrawled on it.
 I’ve made one and cast half a dozen in the hope of the British player not getting carried away with his charges. I may well need some more given the joy a big bang can bring to a game. These are available from Slug Industries.
Tags:28mm, afghanistan, Breach, building, compound, game, gaming, iraq, Jihadistan, Marker, modern, Scenics & Props, Wall
Posted in Scenics & Props | 3 Comments »
May 8, 2012
 One of the most different things about making models for casting rather than just the tabletop is just how much longer it can take. Whereas I can have a model like the one above table ready in just three or four days for casting from it takes at least double if not triple the time to make a master. Thankfully I’ve evolved beyond making masters which get trapped in the mould, so I’m delighted with this one.
 It started with single Hesco blocks. First laid was the first layer, then the second above it, the planking with scribed woodgrain and finally the steps.
 Next came the lower half of the roof, or the table as we came to call it. The only real detail being the woodgrain underneath which you hardly ever see. Well I know it’s there.
 Next was the corrugated roof, but that’s not really protection enough from Terry Taliban’s mortars, so it has to be sandbagged. So a line of sandbags went on, which has to be filled before the next line goes on.
 It starts to look like this but very very slowly…
 Finally got to throw the masters into rubber and lo and behold here’s the very first cast which worked perfectly… phew!
 As did both sections of the roof. A peak of euphoria was reached in 6mil mansions.
 I did take the roof out a little early hence the curve, but married together a neat piece which I hope others will be interested in.
 It’s quite agreeable painted too, although I’m never happy with my drybrushing of the Hesco itself. It takes ages, look passable when it’s inches from your eye but looks a bit scratchy at a distance. Well it does to my hyper-self-critical eyes.
 I’m looking forward to seeing this on the table, it’s big enough to hold five figures or a larger heavy weapons base of figures, and very tough – although my Eureka rocket launcher is on the workbench.
 This model is now availble, unpainted and sans figures, from our humble Slug Industries.
Tags:28mm, afghanistan, building, cast, game, gaming, guardpost, how-to, iraq, Jihadistan, miniatures, modern, resin, sanger
Posted in Scenics & Props | 2 Comments »
March 5, 2012
 With both modelling and gaming the views of friends and family often veer towards them believing we’re a bit special, but not in a complimentary way. Occasionally that gentle misnomer devolves into a raised state bordering between simple insanity and being found fiddling with a farmyard animal. This project was one of those for me and my family, askew looks, whispering, and pledges of not mentioning it to anyone outside of the immediate tribe. That aside I’m now the owner for a very nifty looking opium poppy field – but be aware its for personal recreational use only.
 Firstly I made a trip to the haberdashers for pins of several sizes and some small glass beads which could be slid on to the pins. These were then superglued to the heads of the pins to make the stalk with it’s capsule and the pin head as the crown. For the few flowering ones I sandwiched a sequin between the bead and the pin head. Once dried I ran two or three bands of superglue around the shaft of the pin and flocked it with a long fibrous flock. These were then sprayed and stuck into the furrows which are strips of cork glued onto an MDF base. A small amount of more flock around the base et voila!
 mThere’s just shy of one hundred pins on this quite small field, but it’s a handy game prop and I may even make another – and then onto maize!
A photo how-to make these is available here.
Tags:28mm, afghanistan, how-to, model, modelling, Opium, Poppies, Scenics & Props, scratchbuild
Posted in Scenics & Props | 5 Comments »
February 27, 2012
 Here’s a couple of scenics which might put a few of you dear readers to shame. They’re old GW bits which I’ve had hanging around for years which have finally had something done to them, namely the newly honed terrain skills of Captain Stinky aged 7 and 11/12ths. Armed with the finest brushes the 99p shop could offer, a £1 sampler pot from Wilkinsons and a limited choice of bits from his Grandad’s supplies the young lad took his time but did manage a decent pair of models which most of us would be happy to have on our table.
  The pieces have been undercoated, then painted a very light grey and finished with Devian Mud for the wash. Then they’ve been glued to MDF which has a selection of boulders hand-picked by Stinks himself from the beach, sand on the inside and grass on the outside. His very first scenics to accompany his humble collection of W40k figures.
 What des the lad himself think? “Pew-pew-pew” is all I could get out of him.
Tags:28mm, 40K, Captain Stinky, GW, model, modelling, painting, Scenery, Scenics & Props, wargaming
Posted in Scenics & Props | 1 Comment »
February 16, 2012
 Gutted as I was to realise I’d already used the pun “Last Ditch Effort” I’m happy with this new secnic which I’ve just completed. It’s not only a handy piece but it proved to me how our humble Slug Industries sandbags and planking actually knock together to make a decent model without the hours I’d have spent in the past by hand making every single piece.
 It also gave me an opportunity to use modrock, a bag of which I’d bought around a decade ago but never even opened. It’s a great material, gloriously messy with a hint of mudpies making the endeavour an even deeper recession into child-like joy. To start with I glued the sandbags in place, then used scrap foamboard to make formers for the ground. I wanted the look of earth which had been dug up and piled just a couple of months before, so quite smooth, howvere if you wanted more craggy a style that would be possible too. I overcoated it with Woodland Scenics plaster, or wotsit hydrocalifornia as they insist on calling it. It was great fun and I recommend it for that reason alone, anything more is a plus eh?
 Then it was a bash of colour prior to flocking. I used three types, short dark for the undercoat, longer on top with a few added sprinkles of a flowery flock. The planking was stuck in place, plus a few crates, an oil drum and some single sandbages which we’ve not released yet and the piece was complete. It comes alive with a few figures, these all Uncle Crouchie’s BEF range now available from the ever regal Warlord Games.
 Finally the hour spents cutting the seams on all those sandbags and the grain on the planking has proved itself worthwhile now on with the slaughter!
Tags:1938, 28mm, Anglican League, building, bunker, how-to, model, modelling, Planking, Sandbags, Scenics & Props, scratchbuild, Trench, Uncle Crouchie, ww1, ww2, wwI, wwii
Posted in Scenics & Props | Leave a Comment »


